
| Role | Technical Game Designer / Combat Designer |
|---|---|
| Development | Solo Developer |
| Art | Provided by Class |
| Engine | Unreal Engine 5 |
| Duration | 2.5 Weeks |
About#
Radioactive Rumble is a 2D fighting game developed over two weeks, where I was responsible for all gameplay systems and animation implementation. The game’s fighting style is inspired by Muay Thai, a martial art I practice, and I aimed to translate its rhythm, pressure, and attack variety into gameplay. I handled the full motion capture pipeline: recording, cleaning, refining, and integrating animations directly into a responsive combat framework. Beyond animation, I implemented core fighting game systems including a super meter, move-specific properties, and combat state management. Different attacks were designed with unique attributes such as super armor and variable pushback, requiring careful tuning of hit detection, recovery frames, and player feedback to maintain both balance and impact.
Combat Design and Implementation#
Overview#
The game draws its stylistic roots from Muay Thai, a martial art I practice. I chose this style because as a martial artist I am interested in integrating the real-life combat techniques and strategy I find endlessly fun in sparring into games in a way that more people can enjoy. I also am deeply interested in how older fighting games like “Virtua Fighter” and “Fighters Destiny” on the N64 used more limited movesets yet managed to create a very complex fighting experience. Because of this I built the combat around two design pillars:
- A focus on High-Low combat found in Muay Thai.
- A smaller, more realistic moveset that encourages intelligent combat tool usage.
Offense#
Offensively the character has four categories of moves, each with high-low variants:
Each move is defined using a shared attack data structure:
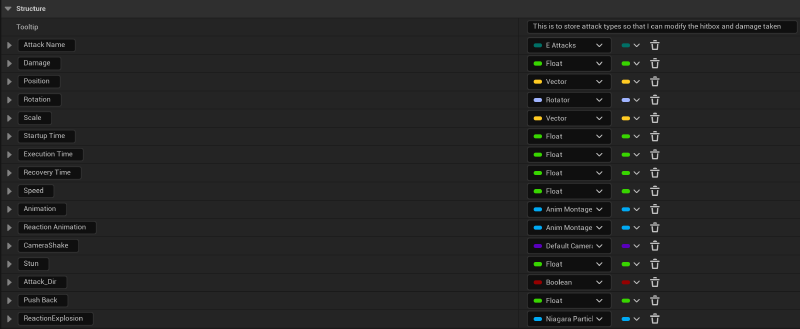
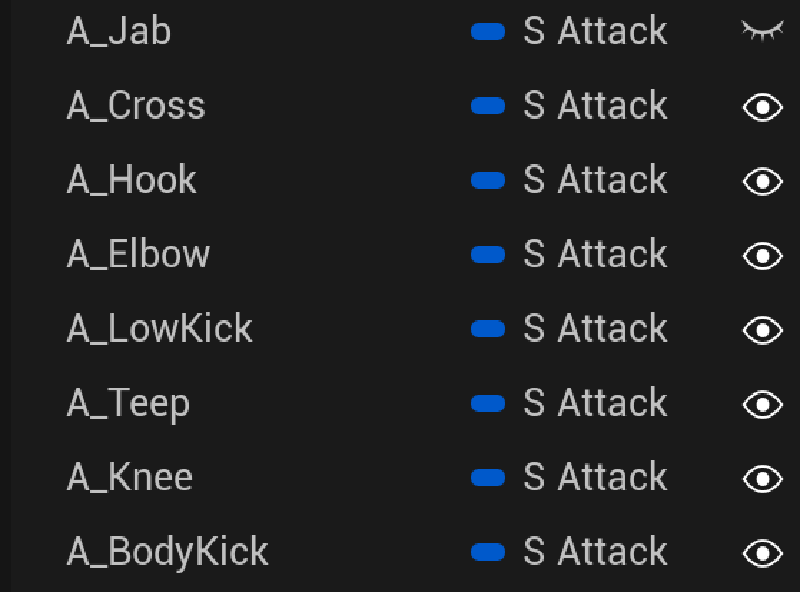
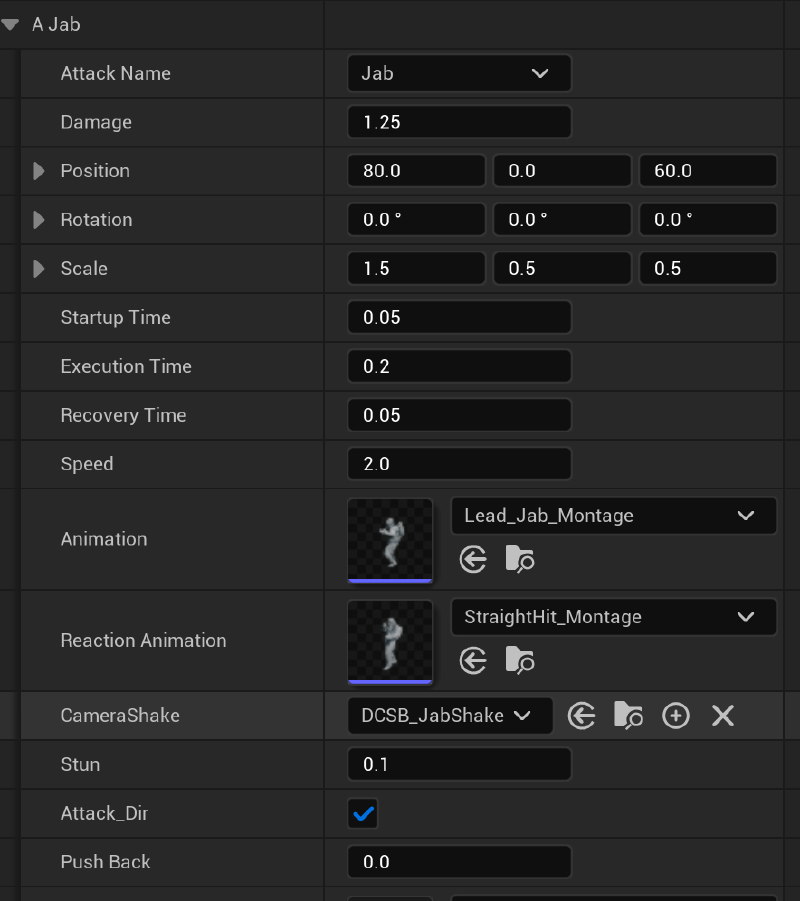
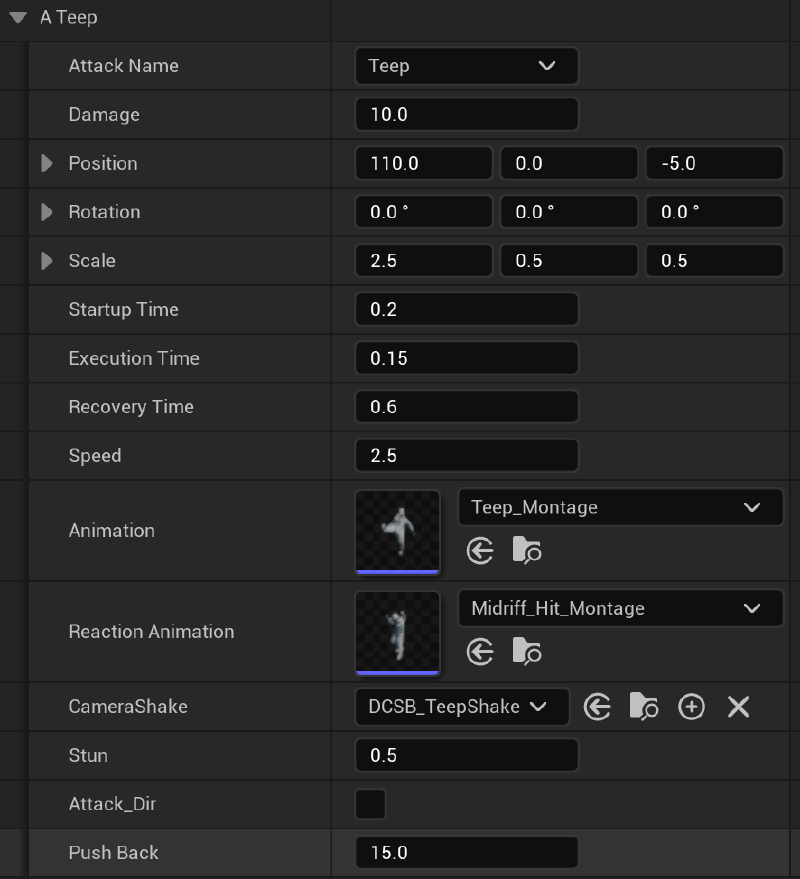
Centralizing these attributes into a single struct allowed me to iterate quickly. I could swap animations, adjust frame timing, tweak hit stun, or modify impact feedback without restructuring the combat logic. This made it significantly easier to refine game feel by simply adjusting values in the editor.
Quick Attacks#
Fast, low damage attacks designed for gauging distance, interrupting combos, and setting up attacks of your own. While safe for the most part, their low damage makes them easy to exploit; the heavy hitting, hyper-armored close range attacks blast through them, and their mid-range hitboxes struggle against a well timed push attack.
These attacks come in two forms:
- The Jab (Executed by pressing Y on the Xbox controller)
- The Low Kick (Executed by pressing X on the Xbox controller)
Push Attacks#
Sometimes an opponent gets too close for comfort, or you need to back them into a corner, that’s what push attacks are for. With the longest hitboxes in the game, medium damage, and a knockback effect, these attacks are built for keeping opponents at arm’s length. They are specifically designed to counter close range attacks by making it impossible for those attacks’ small hitboxes to connect. However, their longer recovery means timing is critical, a well executed parry, block, or dash from your opponent can leave you wide open for devastating return fire.
These attacks come in two forms:
- The Straight (Executed by pressing Y and tapping forward on the Xbox controller)
- The Teep (Executed by pressing X and tapping forward on the Xbox controller)
Medium Attacks#
Slower, mid-ranged, higher damage attacks used to mix up combo timing and act as heavy hitters. These attacks are meant to keep your opponent guessing and punish misreads and mistiming. They shine as mid-combo inclusions and as punishments for whiffed push attacks and close range attacks. However, if not used correctly they are vulnerable to all other attacks especially quick attacks, which can exploit their slower startup.
These attacks come in two forms:
- The Hook (Executed by pressing Y and L2 on the Xbox controller)
- Body Kick (Executed by pressing X and L2 on the Xbox controller)
Close Range Attacks#
Devastating, high damage attacks equipped with hyper-armor, these are built for getting in your opponent’s face and dealing catastrophic damage. Their small hitbox and slow startup are offset by the sheer punishment they deliver, depleting a significant portion of your opponent’s health if they land. Best used as accent pieces in combos or as combo breakers against opponents trying to overwhelm you, they blast through weak quick attack and medium attack strings but struggle against the spacing of push attacks. Their slowness can also be turned into an advantage, punishing overly aggressive parry-chasers.
These attacks come in two forms:
- The Elbow (Executed by pressing Y and R2 on the Xbox controller)
- The Knee (Executed by pressing X and R2 on the Xbox controller)
High-Low Mixups#
To reinforce the high-low design pillar, lower attacks are given longer hitboxes while high attacks deal more damage. This creates a persistent tradeoff for the player, lower attacks are safer and better for controlling space, but high attacks punish harder when they land. In practice this means players can’t rely on a single attack height and must actively mix up their approach to keep opponents guessing, mirroring the rhythm of real Muay Thai where switching between levels is key to breaking down an opponent’s defence.
Defense#
Defensively the character has three categories of maneuvers, each with their own strengths and weaknesses:
Block#
The safest defensive option, but the most passive. Blocks mitigate incoming damage but offer no counter-stun and no avenue to turn the tide. You’re simply absorbing the hit. Best used as a last resort when no better option is available.
There are two types of blocks:
- High Block (Executed by pressing L1 on the Xbox controller)
- Low Block (Executed by pressing R1 on the Xbox controller)
Parry#
High risk, high reward. By tapping and releasing a block button within a tight timing window, a parry reverses the stun your opponent was about to impose on you, and doubles it back on them, opening up a punish window. Excellent for shutting down repetitive combo strings or opponents over-relying on close range attacks. Miss the timing though, and you’ll eat the full hit.
There are two types of parries:
- High Parry (Executed by tapping L1 on the Xbox controller)
- Low Parry (Executed by tapping R1 on the Xbox controller)
Dash#
Versatile and usable both offensively and defensively, the dash lets you blitz in and out of range to avoid attacks and create punish opportunities. Particularly effective in the midrange or when your opponent is cornered, keeping them guessing on your next move. Bad when you yourself are against the wall.
- Dash (Executed by double tapping the left stick left or right on Xbox)
Animation and Other Artistic Implementation#
While I was not in charge of constructing the characters or backgrounds, I did capture, refine, and implement all of the rigs, animations, and FX found in the game. In this section I will walk through my workflow.
Step 1: Capturing the Mocap#
For this project my school used XSens, a popular motion capture suit and software. I instructed someone who could fit the suit how to perform the Muay Thai moves and reactions I wanted the fighters to execute. I then recorded and captured all of the movements and exported them as an FBX, which I pulled into Maya.
Step 2: Retargeting the Mocap in Maya#
Once in Maya I used Human IK, one of Maya’s rigging tools, to retarget the animations onto a standard Mixamo rig. I chose the Mixamo rig for two reasons: I wanted the option to pull additional animations from Mixamo, such as emotes, into Unreal without import issues, and I wanted to ensure both the Scientist and Old Man Phil shared the same rig. Running both characters through Mixamo was the simplest solution.
Step 3: Fixing the Mocap Information in Maya#
After retargeting, I opened Maya’s animation timeline to clean up inconsistencies in the mocap data; things like open hands that needed to be closed. I also addressed a common beginner error where the performer punches sideways instead of forward, which is a difficult habit to correct in someone who hasn’t trained the movement before. Once the data was clean I made the animations slightly more stylized. While it was important to me to keep the fighting style grounded in real Muay Thai, video game attacks still need to be readable, so I exaggerated certain movements just enough to make them clear to the player. I then exported the animations as FBX files.
Step 4: Making Final Touches in Unreal#
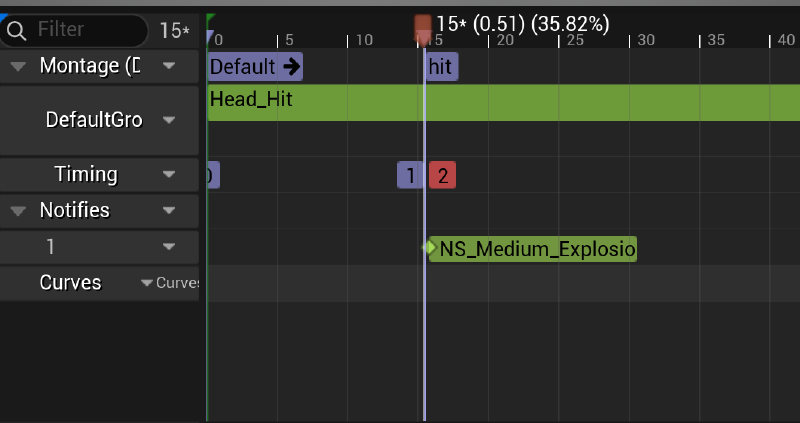
Once in Unreal I imported the animations and verified everything looked correct on the characters, playing through the game and making real time edits directly in Unreal’s animation editor. Once I was happy with the animations I created FX and embedded them directly into Unreal’s Anim Montages, a system I hadn’t worked with before. Anim Montages allowed me to attach effects like hit, block and parry sparks to specific frames of an animation, which gave me much tighter control over the timing of combat feedback than I had anticipated.
Other Things I Learned in the Process#
On top of combat design and getting animations to reflect the moves and reactions I wanted players to see, one of the most important things I learned during this project was Combat Feel.
It’s one thing to give players the ability to throw punches and kicks and react to attacks. It’s another thing entirely to make those attacks feel Crunchy, Impactful, and Satisfying, and that’s what Combat Feel is really about.
So here are the things I did to make combat feel good:
Hitstop and Camera Shake: The bread and butter of any good combat experience. Hitstop pauses the game for just a moment when an attack connects, giving players time to actually see the impact. Camera shake makes the damage felt for both for the attacker and the defender, (Which is one of the things I think make “Super Smash Bros: Melee” so good, their almost comical overuse of camera shake makes the game feel really weighty). By tuning these together, I was able to make every attack feel Crunchy and Satisfying. This project is where I learned Unreal’s approach to implementing both techniques.
Cutting the Reaction Animation in Half: When I first implemented “taking damage” animations, they felt disconnected from the attack even though they were lined up perfectly. It didn’t make sense until I played “Street Fighter 2” on the SNES and noticed most reactions were essentially one frame, usually at the apex. During hitstop, you don’t need the wind-up, you need the result. Trimming reactions to their most exaggerated frame helped sell the Impactfulness of every strike.
Slow In and Out: Some punches and kicks felt loose even though they moved at realistic speeds. The issue wasn’t the full animation, it was the apex frames lacking Crunch, Speed, and Power. By adding anticipation, accelerating the impact frames, and letting recovery breathe a bit more using Slow In and Slow Out, each punch suddenly had much more umph behind it.
FX: Sparks and bursts go a long way after everything else is implemented. They add explosive power and make the game feel like a game. Layered with hitstop, camera shake, and tightened reactions, they complete the feedback loop and make every hit feel like it matters.
Conclusion#
I had a lot of fun with this project. As someone who is extremely interested in Combat Design and fighting in general, it was exciting to make my first real fighting game and build systems around something I actively practice.
I loved learning how to design moves with different abilities and use cases, implement them inside a game engine, and most importantly make them feel great. I also thought it was interesting to learn how to collect, clean, retarget, and integrate motion capture animations using other DCCs and getting them into Unreal. It is something I definitely want to keep exploring in future projects.
More than anything, this project made me feel confident and excited to continue creating, studying, and refining my combat systems so I can give players fun, diverse tools that make every fight feel awesome.